
 Braided Danish Coffee Cake from The Art and Soul of Baking
Serves 6 to 8
This beautiful coffee cake, woven in a braid, never fails to bring a gasp of delight. If you use half the recipe of the Danish dough, you can put together two coffee cakes at a time—one to bake today and the other for the freezer, ready to be thawed and baked for an easy weekend surprise. The filling can be either Almond or Cream Cheese Filling (page 119). If you assemble two coffee cakes at a time, you might want to try a different filling in each coffee cake.
For an extra layer of flavor, sprinkle the top of the filling with finely chopped dark chocolate, and/or a ½-inch-wide length of raspberry or apricot jam. In the summer, use fresh raspberries, blueberries, or sliced plums instead of jam.
Ingredients
¼ recipe (about ¾ pound) Danish Dough (page 114)
½ recipe (about ¾ cup) Almond or Cream Cheese Filling (page 119)
1 recipe Apricot Glaze (page 119)
1 large egg
1 tablespoon milk or cream
3 tablespoons (½ ounce) raw sliced almonds (if using almond filling)
Confectioners’ sugar (for dusting), or Confectioners’ Sugar Icing (page 415), for garnish
Equipment
Rolling Pin, Pastry Brush, Parchment Paper, Ruler, Chef’s Knife, Silicone or Offset Spatula, Baking Sheet, Small Bowl, Cooling Rack
1 Roll and shape the dough: Lightly dust your work surface with flour. Place the dough in the center and dust with flour. Roll into an 8 by 12 by ¼-inch rectangle. (If you are using half the Danish dough and making two coffee cakes, roll the dough to 16 by 12 inches, then cut in half to form two 8 by 12-inch rectangles.) Brush any flour from the surface of the dough. Cut a piece of parchment paper large enough to fit the baking sheet, transfer the dough to the paper, and position so that a short edge is parallel to the edge of your work surface.
2 Using the ruler and the back of a chef’s knife, mark a 2-inch-wide strip down the center of the dough, from top to bottom. This is where the filling will go. On either side of the filling area, make diagonal cuts in the dough, 3 inches long and 1 inch apart. Use a silicone or offset spatula to spread the filling down the center strip of the dough. Braid the dough by crossing alternating strips of dough over the filling from the right and left, working from the top down. When you reach the bottom, press the dough to seal it, then tuck it under slightly. If you are making two coffee cakes, braid the second rectangle of dough the same way, then freeze to bake another day (see “Getting Ahead,” page 122). Transfer the coffee cake, still on the parchment paper, to the baking sheet.
3 Proof the dough: Cover the braid and baking sheet loosely with plastic wrap and let the coffee cake rise in a cool room-temperature spot until it has nearly doubled in size and looks like it has taken a deep breath, about 1 hour. Don’t try to rush the rise by warming the coffee cake—you don’t want the butter to melt.
4 Wash with egg and bake: Preheat the oven to 400°F and position a rack in the center. Chill the coffee cake in the freezer for 10 minutes or in the refrigerator for 15 minutes. This will firm the butter and create a flakier texture. In a small bowl, lightly beat the egg and milk, and brush the top with the egg wash. Sprinkle with sliced almonds, if using almond filling. Bake the coffee cake, rotating the baking sheet halfway through, for 22 to 25 minutes, until golden brown. Transfer to a cooling rack and immediately brush with a thin layer of apricot glaze. Use a fine-mesh strainer to dust the coffee cake with the confectioners’ sugar, or drizzle with icing. Cut slices with a serrated knife.
Storing
The coffee cake will keep, unwrapped at room temperature, for 1 day. For longer storage, double-wrap in plastic and freeze for up to 1 month. Thaw at room temperature for 1 hour, then reheat in a 350°F oven for 9 to 12 minutes, until the crust is crisped and the center is warmed through.
Getting Ahead
You can spread the process of making the Danish dough and baking the coffeecake over 2 days, as described in the “Getting Ahead” notes for making croissants, page 110. You can also freeze the coffeecake already shaped (through Step 2). Freeze on the baking sheet until firm, then wrap twice with plastic wrap. Freeze for 4 to 6 weeks. To bake, transfer the coffeecake directly to a prepared baking sheet and let it defrost and proof at room temperature, covered loosely with plastic wrap. It should be ready for Step 4 in 2 to 3 hours.
Monday, December 21, 2009
Braided Danish Coffee Cake
Monday, December 14, 2009
Fleur De Sel Caramels

Makes 36 Caramels
Salt is usually considered a savory flavor, but it is often sneaked into caramel desserts where it acts to heighten the interplay between bitter and sweet. A pinch of crunchy sea salt flakes on each caramel identifies it as an out-of-the-ordinary candy experience.
• 1 1/4 cups heavy cream
• 6 tablespoons (¾ stick) unsalted butter, plus more for pan
• 1/2 teaspoon flaky sea salt, such as fleur de sel or Maldon, plus more for topping
• 1 2/3 cups sugar
• 1/3 cup light corn syrup
• 1/3 cup water
• 1 teaspoon pure vanilla extract
1. Lightly butter an 8-inch square metal baking pan. Line the bottom and 4 sides of the pan with parchment paper, allowing the paper to overhang the rim on all sides by about 2 inches. (The overhang will be used as “handles” to remove the caramel slab from the pan.)
2. In a saucepan, bring the cream, butter, and salt to a simmer over medium heat, stirring often until the butter melts. Remove from the heat.
3. Combine the sugar, corn syrup, and water in a large, heavy-bottomed saucepan. Bring to a boil over high heat, stirring just until the sugar has dissolved. Continue to boil without stirring, occasionally swirling the pan by its handle and wiping down any sugar crystals that form on the sides with a natural bristle brush dipped in cold water, for about 6 minutes, or until the syrup is dark golden brown—about the color of a new penny. The syrup should have a slightly acrid aroma, and a whiff of smoke should rise from the surface.
4. Gradually and carefully add the hot cream mixture—it will bubble up—to the caramel. When the bubbles subside, clip a candy thermometer to the saucepan. Cook over medium heat, stirring often to avoid scorching, until the temperature reaches 245° to 250°F (firm-ball stage). Remove the heat and stir in the vanilla.
5. Pour into the prepared pan. Transfer to a wire cooling rack and let stand until tepid, about 30 minutes.
6. Using an oiled chef’s knife, score the top of the candy into 36 equal portions. Sprinkle a tiny pinch of salt into the center of each portion, and press with your finger to help it adhere. Let cool completely, 3 to 4 hours.
7. Lift up the paper handles to remove the caramel slab in a single piece. Peel away the parchment paper. Using the oiled knife, cut the caramel through the scores into 36 individual pieces. Wrap each caramel in a square of waxed paper, twisting the ends to seal. The caramels can be stored in an airtight container at cool room temperature for up to 1 week.
Tips for Caramels
• Do not stir the syrup until the butter and cream are added.
• Wash down any crystals that form on the inside of the saucepan with a natural-bristle brush dipped in cold water.
• Judge caramel by color and aroma, not with a candy thermometer.
• Add vanilla extract to hot mixtures after they are finished cooking.
Monday, November 30, 2009
Apricot, Almond, and Chocolate Spiraled Coffee Cake
 From The Art and Soul of Baking
Serves 10 to 12
This gorgeous length of woven, glistening rolls deserves to be the centerpiece at a special brunch or morning gathering. The filling is an almond paste mixture topped with chocolate chips and tart dried apricots soaked in almond liqueur. It’s a large coffee cake, and you can serve up to 16 guests by cutting slices rather than letting guests break off rolls. Don’t worry about leftovers—there won’t be any unless you hide some. If you’ve baked this ahead and plan to freeze it, add the drizzle of sugar glaze only after the coffee cake has been thawed and reheated, or the glaze will soak into the pastry.
Ingredients
1 recipe Rich Breakfast Dough (page 93)
Filling
8 ounces dried California apricots
3 tablespoons (1 ½ ounces) water
3 tablespoons (1 ½ ounces)
amaretto (almond liqueur)
7 ounces almond paste, at room temperature
½ cup (3 ½ ounces) granulated sugar
¾ stick (3 ounces) unsalted butter, softened (65° to 68°F)
½ cup (3½ ounces) mini semisweet chocolate chips Apricot Glaze
3 tablespoons (1 ½ ounces) apricot jam
1 tablespoon (½ ounce) water
Sugar Glaze
½ cup (1¾ ounces) unsifted
confectioners’ sugar
1 teaspoon warm water
Equipment
Food Processor Fitted with a Metal Blade, Small Saucepan, Silicone or Rubber Spatula, Medium Bowl, Rolling Pin, Pastry Brush, Chef’s Knife, Baking Sheet, Silicone Mat, Large Metal Spatula, Cooling Rack, Two Spatulas or a Cake Lifter, Serrated Knife (Optional)
1 Plump the apricots for the filling: Place the apricots in the bowl of the food processor and process until they are chopped into tiny pieces (or use an oiled chef’s knife to chop them very finely). In the small saucepan, heat the water and amaretto over medium heat just until it begins to simmer. Remove from the heat and add the chopped apricots. Let the mixture sit for about 5 minutes, stirring several times with a spatula, until the liquid has been completely absorbed. Transfer to the medium bowl to cool while you prepare the rest of the filling.
2 Make the filling: Cut or break the almond paste into 12 to 15 pieces. Place the almond paste and granulated sugar in the bowl of the food processor and process for 10 to 15 seconds, until the almond paste is cut into tiny pieces. Add the softened butter and process for 25 to 30 seconds, until the mixture is blended and smooth and forms a large ball. The filling will be very thick.
3 Shape the dough: Turn the dough out of the rising tub or bowl onto a work surface dusted with flour. Press down firmly to expel some of the air bubbles, but don’t knead the dough again. Dust the dough with flour and roll into an 11 by 15-inch rectangle. Position the dough so that one of its long sides is parallel to the edge of your work surface. Brush any remaining flour from the surface and underside of the dough. Spread the almond filling in a thin layer over the dough, leaving a 1-inch border along the long side of the dough opposite you. Sprinkle the plumped apricot pieces over the filling as evenly as possible. Do the same with the mini chocolate chips.
4 Roll up the dough: Beginning with the long edge closest to you, roll the dough into a cylinder, gently tucking and tightening as you go. Wet your fingers and rub a thin film of water along the empty border. Finish rolling the dough onto the border. Roll the dough backwards so that the seam is facing upward and pinch all along it to seal the dough. Turn the seam to face away from you and, using the tip of the chef’s knife, cut the dough into slices at 1½-inch intervals, cutting only ¾ of the way across the roll so the seam is still intact—all the slices should be attached along a “spine.” Gently lift the log of dough and center it on the prepared baking sheet, seam or “spine” down. Gently twist each slice away from the spine and lay it nearly flat on the sheet (the slices will overlap slightly and won’t lie completely flat). Alternate the direction of the twists, one slice to the right, one slice to the left, until you reach the end. At first it will seem as though the roll is too long for the pan, but keep overlapping and you’ll find you have room at the top and bottom of the coffee cake.
5 Proof the dough (second rise) : Cover the dough loosely with plastic wrap or a damp lint-free towel and allow to rise until it is almost doubled in size and looks like it has taken a deep breath, 40 to 60 minutes.
6 Bake the coffee cake: Preheat the oven to 375°F and position an oven rack in the center. Bake the coffee cake for 20 to 25 minutes, until golden brown on the top and bottom (check the bottom by lifting the coffee cake slightly with a large metal spatula). Transfer to a cooling rack.
7 While the pastry is baking, make the apricot glaze: Heat the apricot jam and water in the cleaned small saucepan over medium-low heat, stirring with a silicone or rubber spatula to blend, until hot and fluid. When the cake is out of the oven and on the rack, rewarm the glaze and brush it over the cake. Cool for 15 minutes, then apply another layer of the glaze. Allow the coffeecake to cool an additional 20 minutes before adding the sugar glaze.
8 Make the sugar glaze: In the cleaned medium bowl, stir the confectioners’ sugar and warm water vigorously with a silicone or rubber spatula until there are no lumps remaining, adding a few more drops of water if needed. Use a fork to drizzle the glaze over the pastry, or transfer the glaze to a resealable plastic bag and squeeze it into one corner. Snip off the corner with a pair of scissors and pipe lines decoratively across the coffee cake. Use two spatulas or a cake lifter to transfer the coffee cake to a serving platter. Serve warm or room temperature. Let guests tear off rolls, or slice with a serrated knife.
Storing
The coffee cake can be stored, uncovered at room temperature, for 1 day. For longer storage, cover with plastic wrap and leave at room temperature for another day, or store in the refrigerator for up to 3 days. Reheat in a 375°F oven for 8 to 10 minutes, until warmed through.
Getting Ahead
Prepare the coffee cake through Step 4, then cover loosely with plastic wrap and refrigerate overnight. The coffee cake will continue to rise slowly through the night. The next day, let it sit at room temperature for 1 hour before baking.
The baked and cooled coffee cake can be frozen, wrapped tightly in 2 layers of plastic wrap, for up to 2 weeks—do not add the sugar glaze until the day you serve the coffee cake. To thaw, set on the counter until it reaches room temperature, about 2 hours. Reheat as directed above.
Rich Breakfast Dough
Makes about 1 ½ pounds A leaner version of brioche dough, this can be used for all those wonderful, yeasted breakfast breads you love, like sticky buns and coffee cake. Classic brioche, while delicious, is unnecessarily rich when paired with flavor-packed fillings and toppings. Despite the reduced amount of eggs and butter, this dough is still soft and easy to work with, and it bakes into a tender, flavorful partner for all manner of fillings, both sweet and savory.
Ingredients
½ cup (4 ounces) warm whole milk (110° to 115°F)
¼ cup (1 ¾ ounces) sugar
1 ½ teaspoons active dry yeast, or
1 ¹⁄8 teaspoons instant yeast
1 large egg plus 1 egg yolk, at room temperature
2 ½ cups (12 ½ ounces) bread flour or unbleached all-purpose flour
½ teaspoon salt
1 stick (4 ounces) unsalted butter, very soft (not melted)
Equipment
Stand Mixer Fitted with a Dough Hook Attachment, Whisk, Silicone or Rubber Spatula, 10- to 12-inch Straight-Sided Translucent Plastic Tub or Mixing Bowl, Bowl Scraper
1 Mix and knead the dough: Combine the warm milk and sugar in the bowl of the stand mixer and sprinkle the yeast over the top. Whisk by hand to blend well. Let the mixture sit for 5 to 10 minutes, until the yeast is activated and foamy or bubbling. Add the egg and yolk and whisk by hand until well blended. Stir in the flour and salt with a silicone or rubber spatula. Attach the dough hook and knead on low speed for 2 minutes. The dough may look ragged at this point, but don’t worry—the addition of butter will smooth it out. Increase the speed to medium and knead for 1 minute. With the mixer running, add the soft butter, 1 tablespoon at a time, allowing each addition to blend in before adding the next. Once all the butter has been added, decrease the speed to medium-low and continue to knead for 5 to 6 minutes longer, until the dough looks soft and silky.
2 Rise the dough (First Rise) : Lightly butter or oil the tub or bowl, scrape the dough into the tub, and brush the surface of the dough with a little butter or oil. Cover with plastic wrap or a damp lint-free cotton towel and let the dough rise until doubled, 1 to 1 ½ hours. If you are using a tub, be sure to mark the starting level of the dough with a pencil or piece of tape so it’s easy to tell when the dough has doubled. At this point, the dough is ready to be punched down and used in your recipe of choice.
Storing
The dough can be punched down and refrigerated overnight. Wrap in plastic, leaving a bit of wiggle room for when the dough continues to expand in the refrigerator, or place in a bowl large enough to allow it to expand; cover with plastic wrap. (If you don’t leave room for expansion, the dough will burst through the plastic wrap.)
Getting Ahead
You can freeze the dough for up to 1 month. Punch the dough down, wrap in plastic and place in a resealable plastic freezer bag. To thaw, refrigerate overnight, or place on the counter for 2 hours, or until room temperature. Continue with your recipe of choice.
What the Pros Know
Be sure the butter is very soft before beginning, or you’ll have cold lumps of butter in the dough. If this happens, cover the dough and let it sit at room temperature for 20 to 30 minutes, until the butter has softened, then continue kneading.
Tuesday, November 24, 2009
Great Pumpkin Pie & Flaky Pie Dough
 From The Art & Soul of Baking
Great Pumpkin Pie
Makes 1 (10-inch) regular pie or 1 (9-inch) deep-dish pie, serving 10 to 12 Thanksgiving just may be everyone’s favorite holiday. After all, what’s better than a day completely devoted to a delicious feast shared by family and friends, all giving thanks for their blessings? This recipe takes an American classic to celebration status with a careful blend of spices and heavy cream, outshining the stale spice mix and evaporated milk of less enchanting recipes. Ever notice how spices clump up and don’t blend well when added to a custard? The trick is to blend them first with the eggs, whose fat helps the clumps disperse evenly, before adding any liquid to the custard mixture.
Ingredients
1 recipe Flaky Pie or Tart Dough (page 177 - recipe below), prepared through Step 8
3 large eggs
1 ½ teaspoons ground cinnamon
¾ teaspoon ground ginger
¼ teaspoon nutmeg (about 20 grates on a whole nutmeg)
¼ teaspoon ground cloves
¼ teaspoon ground allspice
¹⁄8 teaspoon salt
1 ½ cups (12 ounces) heavy whipping cream
½ cup (4 ounces) firmly packed light brown sugar
¼ cup (1 ¾ ounces) granulated sugar
2 cups (16 ounces) canned pumpkin puree (not pumpkin pie filling)
Softly Whipped Cream (page 416 - recipe below), for serving
Equipment
10-inch Regular or 9-inch Deep Dish Pie Pan, Pie Weights, Cooling Rack, Whisk, Large Bowl, Fine-Mesh Strainer, Medium Saucepan, Silicone or Rubber Spatula, Thin and Sharp Knife
1 Bake the shell: Preheat the oven to 375°F and position an oven rack in the bottom third. Line the chilled pie shell with heavy-duty foil, pressing the foil firmly and smoothly into the crevices of the pan. Fill the pan with pie weights (page 175). Make sure the weights reach up the sides to the rim of the pan (the center does not need to be filled quite as full). Bake the shell for 20 to 22 minutes, until the foil comes away from the dough easily (if it doesn’t, then bake another 5 to 6 minutes and check again). Remove the pan from the oven, close the oven door, and lift out the foil and weights from the shell; set them aside to cool. Return the pan to the oven to continue baking the shell for about 10 minutes, then remove the pan from the oven, close the oven door, and check to see if any cracks have formed. If you see a crack, very gently smear a tiny bit of reserved dough over the crack to patch it (page 171)—you need only enough to seal the opening. Return the pan to the oven and bake 10 to 15 minutes longer, until the crust is a nice golden brown all over. Transfer to a rack and cool slightly. Lower the oven temperature to 350°F.
2 While the pie crust is baking, make the filling: Whisk the eggs in the large bowl to break them up. Add the cinnamon, ginger, nutmeg, cloves, allspice, and salt and whisk well to blend evenly. Whisk in the cream, brown sugar, and granulated sugar and blend well. Strain the mixture through the strainer into the medium saucepan, pressing on the strainer with the spatula to push through any lumps of brown sugar. Add the pumpkin puree and whisk until the custard mixture is thoroughly blended. Cook over medium-low heat, stirring constantly with the spatula and scraping all over the bottom of the pan to prevent the eggs from scrambling, for 7 to 9 minutes, until the mixture feels lightly thickened and registers 150°F on an instant-read thermometer. Do not let the mixture scramble or you’ll have to begin again. Remove from the heat.
3 If the pie crust has cooled, reheat it in the oven for 5 minutes. Scrape the hot custard into the hot pie shell and bake for 30 to 40 minutes, until the custard is set. Test by tapping the side of the pie pan—the center of the pie should look firm and move as one piece (professionals call this the Jell-O jiggle). Transfer the pie to a rack and cool completely, about 2 hours.
4 To serve, slice the pie with a thin and sharp knife and use a pie server to transfer each slice to a plate. Serve with whipped cream. Storing Store at room temperature for up to 8 hours. For longer storage, cover with plastic and refrigerate. Remove the pie from the refrigerator 1 hour before serving. Pumpkin pie is best the first or second day, as the crust begins to soften over time. It will keep, covered with plastic wrap, in the refrigerator for up to 4 days.
What the Pros Know
There’s a trick to making pumpkin pie that keeps the prebaked crust crisp against the liquid custard filling, and it defies logic. You’ve probably always heard that a prebaked pie crust should be cooled before being filled with custard and sent back to the oven. Not here. The crust should be hot from the oven (or reheated until hot) and then filled with hot custard. It’s crazy, but it works beautifully. The bonus is that hot crust plus hot custard equals a shorter baking time. While pumpkin pies usually take an hour or more to bake, this one is finished in about 30 minutes. Now that’s a reason to be thankful.
Getting Ahead
The pie crust can be rolled, fitted into the pie pan, and trimmed up to 2 days before baking the pie and refrigerated, or it may be frozen for up to 1 month. The crust can be baked up to 3 days in advance and stored, wrapped in plastic, at room temperature. The ingredients for the custard can be combined 1 day in advance and kept, airtight, in the refrigerator. Do not warm the custard on the stovetop until just before you bake it.
Flaky Pie or Tart Dough
Makes 1 (9- or 10-inch) pie shell Many bakers are so intimidated by the idea of making flaky pie crust that they either settle for the prepared dough from the grocery store or don’t make pie at all. But, like all baking, pie crust is quite straightforward once you know how the ingredients work together. If you’re new to pie dough, be sure to read the primer (page 168); then take a deep breath and follow the steps below for a beautifully crisp, golden brown, flaky pie crust. This recipe doesn’t call for shortening, as the flavor, aroma, and color of an all-butter crust can’t be beat. The drawback to butter is that it can soften quickly at room temperature, which is why it’s best to use the food processor to ensure great results every time. Weigh your dry ingredients if you can, but if you don’t have a scale, you can measure by the dip-and-sweep method (page 4).
Ingredients
1 stick (4 ounces) cold unsalted butter, cut into ½-inch pieces
3 to 4 tablespoons cold water
1 ¼ cups (6 ¼ ounces) unbleached all-purpose flour
1 ½ teaspoons sugar (omit for a savory crust)
¼ teaspoon salt
Equipment
Small Measuring Cup, Food Processor Fitted with a Metal Blade, Large Bowl, Rolling Pin, Pastry Brush, 9- or 10-inch Pie or Tart Pan, Kitchen Scissors
1 Place the butter pieces in a bowl or on a plate and freeze for at least 20 minutes. Refrigerate the water in a small measuring cup until needed.
2 Mix the dough: Place the flour, sugar, and salt in the bowl of the food processor. Process for 10 seconds to blend the ingredients. Add the frozen butter pieces and pulse 6 to 10 times (in 1-second bursts), until the butter and flour mixture looks like crushed crackers and peas.
3 Immediately transfer the butter-flour mixture to the large bowl. Sprinkle a tablespoon of the cold water over the mixture and “fluff” it in, then add another, and another, until 3 tablespoons have been added. Continue to fluff and stir 10 or 12 times. It will not be a cohesive dough at this point but a bowl of shaggy crumbs and clumps of dough. Before bringing the dough together, you need to test it for the correct moisture content. Take a handful of the mixture and squeeze firmly. Open your hand. If the clump falls apart and looks dry, remove any large, moist clumps from the bowl then add more water, one teaspoon at a time, sprinkling it over the top of the mixture and immediately stirring or mixing it in. Test again before adding any more water. Repeat, if needed. The dough is done when it holds together (even if a few small pieces fall off). If the butter feels soft and squishy, refrigerate before continuing. If the butter is still cold and firm, continue to the next step. (Note: Adding the liquid may also be done on low speed in a stand mixer fitted with the paddle attachment—add three-fourths of the liquid, test for moistness, then add the remaining liquid if needed.)
4 Knead and chill the dough: Turn the dough onto a work surface and knead gently 3 to 6 times. If it won’t come together and looks very dry, return it to the bowl and add another teaspoon or two of water (one at a time), mixing in as above, and try again. Flatten the dough into a 6- or 7-inch disk, wrap in plastic or parchment paper, and refrigerate for 30 minutes. This allows time for the dough to hydrate fully and for the butter to firm up again.
5 Roll the dough: If the dough has been refrigerated for more than 30 minutes, it may be very firm and hard and will crack if you try to roll it. Let it sit on the counter for 10 to 15 minutes until it is malleable but still cold. Dust your work surface generously with flour and set the disk on the flour. Dust the top with flour. Roll, turning the dough and following the directions on page 171, until you’ve got a 14- to 15-inch circle about ¹⁄8 inch thick. If at any point the dough becomes warm and sticky, gently fold it into quarters, unfold it onto a baking sheet and refrigerate for 15 minutes, or until the butter is firm again.
6 If a crack or hole forms while rolling, brush any flour away and patch the area according to the instructions on page 171.
7 Transfer the dough: Fold the dough circle into quarters, brushing off any excess flour as you fold. Put the point of the folded dough in the center of the pie pan, tart pan, or baking sheet and unfold the dough, lifting it slightly as necessary to ease it into the crevices of the pan. Do not stretch or pull the dough, which can cause thin spots, holes, and/or shrinkage during baking.
8 Trim the dough: Use a pair of kitchen scissors to trim the dough so it overhangs the edge of the pan by 1 inch. Fold the overhanging dough under itself around the pan edge, then crimp or form a decorative border (page 174). Chill for 30 minutes before baking.
Storing
The dough can be wrapped in plastic and refrigerated for up to 2 days, or double-wrapped in plastic, slipped into a freezer bag, and frozen for up to 1 month.
Softly Whipped Cream
Makes 2 cups The quintessential partner to nearly any dessert, whipped cream—which should be thick yet soft and smooth—can be flavored in a multitude of ways, though vanilla is the classic. Chill your bowl and whisk in the freezer for 10 minutes before you begin. Look for pasteurized cream (instead of ultrapasteurized) or, if you can find it, use manufacturing cream, which contains a higher percentage of milk fat and whips up to be thicker, more luscious, and more stable than any other type. For more on types of cream, see page 33.
Ingredients
1 cup (8 ounces) heavy whipping cream
2 teaspoons sugar
1 teaspoon pure vanilla extract
Equipment
Stand Mixer Fitted with a Whisk Attachment or a Hand Mixer and a Medium Bowl
Place the cream, sugar, and vanilla in the bowl of the mixer (or in a medium bowl, if using a hand mixer) and whip on medium speed until soft peaks form. Cream whipped on medium speed is more stable than one whipped on high speed. When used as an accompaniment, the cream should look smooth and satiny, and barely hold its shape. To use as a filling or frosting, whip for another 10 to 15 seconds, until firmer. Use immediately or refrigerate until needed.
Storing
Whipped cream is at its best when used within 2 hours of preparation. However, it can be whipped up to 8 hours ahead and stored in an airtight container in the refrigerator. If the cream seems too soft when you’re ready to use it, beat it lightly with a hand whisk to firm it up.
Watch a Demo of How to Make Pumpkin Pie and Flaky Pie Dough
Monday, November 16, 2009
Buckwheat Crepes with Sautéed Aples and Gruyère Cheese
 From Things Cooks Love: Implements. Ingredients. Recipes.
Prep (batter) 10 min | Resting time (batter) 1 hr |
Prep (filling) 30 min | Cook time 2 min per crepe |
Serves 4–6
Throughout France, you will find small restaurants, often tucked away on side streets, specializing in crepes. In Brittany, the crepes are made with buckwheat flour and the typical filling is a smear of salted butter, cheese, ham or bacon, thinly sliced fruit, and/or eggs. In most of France, crepes are rolled up or folded into half or quarter circles, but in Brittany, where they are sometimes called galettes, they are folded differently. The filling is spread in the center of the pancake, the four rounded sides are folded in over the filling, forming a square, and then the crepe is inverted onto a serving plate.
Implements
Standard Whisk, Large Skillet, 9- to 11-inch Crepe Pan, Small Ladle, Small, Narrow Rubber Spatula, Wide Spatula (Optional)
Ingredients
Crepe Batter
1 cup buckwheat flour
½ cup all-purpose flour
1 teaspoon coarse salt
2 large eggs
1½ cups water
2 tablespoons salted or unsalted butter, melted
Filling
4 tablespoons salted or unsalted butter
3 yellow onions, cut into ¹⁄8-inch wedges
6 slightly green Golden Delicious apples,
quartered, cored, and cut into ¹⁄8-inch wedges
2 ounces smoked ham, thinly slivered (optional)
3 tablespoons freshly squeezed lemon juice
¹⁄8 teaspoon freshly grated nutmeg
Pinch of coarse salt
1 tablespoon salted or unsalted butter, melted, plus 2 tablespoons, softened
3 cups (12 ounces) coarsely grated Gruyère or Comté cheese
1. Make the crepe batter: In a large bowl, stir together the buckwheat flour, all-purpose flour, and salt. In a small bowl, whisk the eggs until well blended; stir in the water and butter. Gradually whisk the egg mixture into the flour mixture until the batter is smooth. Cover and refrigerate for 1 hour. The batter should be the consistency of heavy cream. If it is too thick, whisk in additional water, 1 tablespoon at a time.
2. While the batter is resting, prepare the filling: In a large skillet, melt the butter over medium-low heat. Add the onions, increase the heat to medium, and cook, stirring, for 5 minutes. Add the apples and cook, stirring, for 10 to 15 minutes, until the apples begin to brown and have softened. Add the ham and sprinkle with the lemon juice, nutmeg, and salt. Cover and set aside until ready to fill the crepes.
3. Heat a 9- to 11-inch crepe pan over medium-low heat until hot enough for a drop of water to sizzle on contact. Brush the surface of the crepe pan with a thin film of the melted butter. Blot any excess with the tip of a paper towel. Stir the crepe batter well with the whisk. Ladle about ¹⁄3 cup of the batter into the heated pan, and simultaneously tilt and roll the pan from side to side to coat the surface with a thin layer of batter. Cook for 1 minute, or until the edges begin to set. Run the tip of a small, narrow rubber spatula under the edges of the crepe to loosen it from the pan. Use your fingertips to lift the crepe and quickly flip it over. Cook the other side for 30 seconds, or until the batter is set into a thin pancake. Do not brown the crepe or cook it until crisp. Transfer the crepe to a large, round plate. Repeat with the remaining batter, brushing the pan with more butter if necessary. Stack the crepes as they are made. You should have 12 crepes. If making ahead, wrap the crepes in plastic wrap or aluminum foil to prevent drying out. The crepes can be refrigerated for up to 2 days.
4. If the crepes have been made ahead, fill them one at a time by first warming each crepe in the pan over low heat. While they are still in the pan, sprinkle about ¼ cup of the cheese in the center of the crepe. Top the cheese with a large spoonful of the warm apple filling, spreading it into a single layer. Fold in two opposite sides of the circle to cover the filling. Then fold in the remaining two rounded sides, overlapping slightly, to form a square envelope. With a wide spatula, lift the crepe from the pan and invert it, so it is seam side down, onto a serving plate. Cover with aluminum foil to keep warm if not serving at once. Fill the remaining crepes in the
same way. Reserve the remaining filling.
5. Just before serving, brush the smooth top of each crepe with a thin film of the softened butter. Reheat the remaining apple filling and spoon a portion on top of each crepe. Serve at once.
Monday, October 26, 2009
Panfried Skirt Steaks with Red Wine Béarnaise Sauce

Serves 4
Skirt steak is one of the most flavorful cuts and can be quickly panfried in a skillet on the stove top. The sophisticated and easy béarnaise sauce—it’s made in a blender—gives the steak a nice touch of class. When you cook the steak, be sure to turn on the range hood to avoid smoking up the kitchen.
• 4 (7-ounce) skirt steaks
• 1½ teaspoons kosher salt
• ½ teaspoon freshly ground black pepper
RED WINE BÉARNAISE SAUCE
• ¼ cup hearty red wine, such as Cabernet-Shiraz blend
• ¼ cup red wine vinegar
• 3 tablespoons finely chopped shallots
• 1 tablespoon chopped fresh tarragon
• ¼ teaspoon coarsely ground black pepper
• 3 large egg yolks
• 1 ½ cups (3 sticks) unsalted butter, cut into tablespoons
• Kosher salt
Trim a few pieces of fat from the steaks and reserve. Mix together the salt and pepper, and season the steaks all over with the mixture. Let the steaks stand at room temperature while you make the sauce.
To make the béarnaise sauce, combine the wine, vinegar, shallots, tarragon, and coarsely ground pepper in a small, nonreactive saucepan. Bring to a boil over high heat and cook until the liquid is reduced to about 2 tablespoons. Strain through a fine-mesh sieve into a small bowl, pressing hard on the solids to extract as much flavor as possible. Reserve the solids in the sieve.
Put the egg yolks and strained wine mixture in a blender. In a saucepan, bring the butter to a boil over medium heat. Pour the hot butter into a heatproof glass measuring cup. Skim the foam off the surface of the butter. With the blender running, slowly add the hot butter through the hole in the lid, leaving the milk solids in the measuring cup. It should take about 1 minute to add the butter. Then uncover the blender, add the reserved solids in the sieve, re-cover, and pulse just to combine. Season with salt. Transfer to the top part of a double boiler and keep warm for up to 30 minutes. (Or transfer the sauce to a warmed widemouthed Thermos and keep warm for up to 2 hours.)
Heat a large cast-iron skillet over medium-high heat until very hot. Add the reserved beef fat and use tongs to wipe a thin coating of fat over the entire bottom of the skillet. Remove and discard the fat. Add the steaks and cook, turning once, for about 5 minutes total for medium-rare, or until they are nicely browned on both sides and feel somewhat resilient when pressed in the center.
Transfer each steak to a dinner plate. Spoon the sauce into a serving bowl. Serve the steaks hot, and pass the sauce at the table.
Tips for Skirt Steak with Béarnaise Sauce
• A cast-iron skillet creates a beautiful crust on steaks.
• Grease the skillet with some of the beef fat.
• Keep béarnaise sauce warm in a double boiler or in a widemouthed Thermos.
• Use a nonreactive saucepan to cook the acidic ingredients for the sauce.
Tuesday, October 20, 2009
Lamb Tagine with Artichoke Hearts, Dried Apricots, and Preserved Lemon
 From Things Cooks Love: Implements. Ingredients. Recipes.
Prep 30 min | Cook time 2 hr | Serves 6
Lamb, artichokes, and dried fruit are a classic combination for a Moroccan tagine, but it is the bouquet of spices—saffron, cumin, ginger, coriander, cinnamon—that make this dish memorable. To savor the wonderful flavors in the sauce, spoon the tagine onto mounds of fluffy couscous (page 317). This recipe calls for browning the lamb, which you can do in a tagine if it is has a stainless steel–clad or castiron base. If your tagine is all earthenware, simply toss the meat with the ingredients and simmer in the tagine over low heat. Alternatively, brown the meat in a skillet and transfer it to the tagine for simmering, or prepare the entire dish in a Dutch oven or braiser.
Implements
Tagine, Cutting Board, Chef’s Knife, Paring Knife
Ingredients
2 to 2½ pounds trimmed, boneless lamb shoulder or lamb shank, cut into 1-inch chunks
2 teaspoons coarse salt
½ teaspoon freshly ground black pepper
3 tablespoons extra-virgin olive oil
2 cups ¼-inch-thick yellow onion wedges
10 saffron threads
1½ teaspoons ground cumin
1 teaspoon ground ginger
½ teaspoon ground coriander
1 cup peeled, sliced (¼ inch) carrot
1 cinnamon stick
1 cup low-sodium chicken broth or water, plus more as needed
1 cup drained canned Italian plum tomatoes, cut into 1-inch chunks
2 stems Italian parsley, plus 1 tablespoon finely chopped
2 stems cilantro, plus 1 tablespoon finely chopped
4 artichokes, preferably with stems, or 1 (10-ounce box) frozen artichoke hearts
1 lemon, halved
4 ounces (about 1 cup) dried apricot halves
2 tablespoons chopped preserved lemon rind (page 328)
1 tablespoon finely chopped fresh mint
1. Place the lamb in a large bowl, sprinkle with the salt and pepper, and toss to coat evenly. Set aside.
2. Heat a stainless steel–clad or cast-iron base of a tagine (see headnote for alternatives) over medium-low heat and add the olive oil. When the oil is hot enough to sizzle a piece of onion, increase the heat to medium, add the onion wedges, and cook, stirring, for 10 minutes, or until they wilt and begin to turn color. Meanwhile, in a small bowl, stir together the saffron, cumin, ginger and coriander.
3. Add the meat, carrot, and cinnamon to the onion, increase the heat to medium-high, and cook, stirring constantly, for 5 minutes, or until the meat begins to brown. Add the chicken broth, tomatoes, parsley and cilantro stems, and the saffron mixture and bring to a boil.
4. Place the lid on the tagine, decrease the heat to low, and cook, without disturbing the cover, for 1 ½ hours, adjusting the heat to keep the stew at a gentle simmer.
5. Meanwhile, if using fresh artichoke hearts, fill a medium bowl half full with water; squeeze the juice from a lemon half into the water, and add the spent lemon half to the water. Working with 1 artichoke at a time, pull the leaves back and tear them off where they meet at the base (bottom), until you reach the pale green inner leaves. (Reserve the leaves for another use.) Turn the artichoke on its side on a cutting board and, with a chef’s knife, cut the attached leaves off just where they meet the base. Cut the stem off the base and reserve. With a paring knife, trim the dark green outer layer from the base. With the tip of a spoon, scoop the fuzzy portion from the center and discard. Rub the trimmed artichoke bottom with the remaining lemon half. Cut the bottom into quarters and add to the lemon water. Peel the fibrous outer layer from the stem and cut crosswise into ½-inch lengths. Add to the lemon water. Repeat with the remaining artichokes.
6. After 1½ hours, test the meat for tenderness. It should be fork-tender. If it isn’t, simmer it a little longer and test again.
7. When the meat is tender, drain the fresh artichokes and add them, or add the frozen artichoke hearts, and the apricots. Re-cover and cook for 30 minutes, or until the fresh artichokes are tender, or only 10 minutes if using frozen artichoke hearts. Stir in the preserved lemon.
8. If the stew is swimming in liquid, use a slotted spoon to transfer the solids to a bowl, cover with aluminum foil, and place in an oven set at 200°F. Boil the liquid, uncovered, for 10 minutes, or until reduced slightly. Return the solids to the tagine.
9. Sprinkle the finely chopped parsley, cilantro, and mint over the top. Re-cover the tagine and carry it to the table.
Uncover and serve.
Monday, September 21, 2009
Roasted Fish with Achiote, Potatoes, Chile Strips, and Orange Salsa
 From Things Cooks Love: Implements. Ingredients. Recipes.
Prep 30 min | cook time 50 min | serves 4
For this recipe, use achiote paste (adobo de achiote). This typical dish of the Yucatán combines the earthytasting achiote with fish, potatoes, and a pretty, refreshing citrus salsa. Serve with a green vegetable or a tossed salad.
Implements
Molcajete, 9-by-13-inch Terra-Cotta Baking Dish
Ingredients
Achiote Sauce
1 clove garlic
1 tablespoon chopped white onion
½ teaspoon coarse salt
½ teaspoon chile powder
½ teaspoon grated orange zest
1 (½-by-¼-inch) piece achiote paste
2 tablespoons freshly squeezed orange juice
1 tablespoon flavorless vegetable oil
Rajas (Poblano Chile Strips), page 180
1 pound Yukon Gold or any potatoes, unpeeled, cut into ½-inch wedges
1 large white onion, cut into ¹⁄8-inch wedges
Orange Salsa
1 large navel orange
1 plum tomato, seeded and chopped
1 tablespoon finely chopped red onion
1 tablespoon freshly squeezed lime juice
1 tablespoon finely chopped fresh cilantro
Pinch of coarse salt
1 ¼ pounds skinless firm fish fillet (such as halibut, ling cod, or red snapper), preferably in a single piece
1. Make the achiote sauce: Place the garlic, onion, salt, chile powder, orange zest, and achiote in a molcajete or other mortar and mash with a pestle until blended and the mixture becomes a paste. Gradually work in the orange juice and oil with the pestle. Alternatively, combine the ingredients in a blender or small food processor and process until smooth. Set aside.
2. Make the rajas and set aside.
3. Preheat the oven to 400°F. In a medium bowl, combine the potatoes, onion slices, and half of the achiote sauce and stir to coat the potatoes. Spread the potato mixture in a 9-by-13-inch terra-cotta baking dish or another type of baking dish. Roast the potatoes, turning once at the
midpoint, for 35 minutes, or until golden and almost tender. Remove the baking dish from the oven.
4. While the potatoes are roasting, make the orange salsa: Use a sharp, thin knife to cut the peel and all the white pith from the orange. Working over a bowl, cut along both sides of each segment to release it from the membrane, allowing the segments and the juices to drop into the bowl. Coarsely chop the orange segments and return them to the bowl with the juices. Add the tomato, onion, lime juice, cilantro, and salt, and stir gently to combine. Taste and adjust the seasoning with salt. Let stand at room temperature until ready to serve.
5. Brush one side of the fish with half of the remaining achiote sauce mixture. Push the potatoes to the edges of the baking dish, and place the fish, sauce side down, in the center of the dish. Brush the top of the fish with the remaining sauce. Arrange the rajas on top of the fish, spacing them about ½ inch apart. Rearrange the potatoes, placing some of them on top of the fish.
6. Return the baking dish to the oven and roast for 15 minutes, or until the fish is opaque when cut into at the thickest part with a knife.
7. Spoon the salsa over the fish and serve from the baking dish or transfer the fish to a platter and serve.
Thursday, September 17, 2009
Chocolate Chip Cookies
 From The Art and Soul of Baking
Makes about 60 cookies
There’s a reason Realtors like to bake these cookies when showing a house to potential buyers. Few among us can resist the mouthwatering aroma of butter, brown sugar, and chocolate that reminds us of all things warm and wonderful. There are many versions of this American classic—this is a favorite, bursting with chunks of both semisweet and milk chocolate, with an extra splash of vanilla added for a deep, round flavor.
1 ½ sticks (6 ounces) unsalted butter, softened (65° to 68°F)
¾ cup (5 ¼ ounces) granulated sugar
¾ cup (6 ounces) firmly packed light brown sugar
2 large eggs, at room temperature
2 teaspoons pure vanilla extract
2 ¼ cups (11 ¼ ounces) unbleached all-purpose flour
1 teaspoon baking soda
1 teaspoon salt
6 ounces good-quality semisweet or bittersweet chocolate, chopped into ¼-inch chunks, or 1 cup (7 ounces) dark chocolate chips
6 ounces good-quality milk chocolate, chopped into ¼-inch chunks, or 1 cup (7 ounces) milk chocolate chips
½ cup (2 ¼ ounces) chopped nuts (walnuts, almonds, pecans, or hazelnuts), chopped, toasted, and completely cooled (optional)
Equipment
Two or Three Baking Sheets, Parchment Paper, Stand Mixer Fitted with a Paddle Attachment or a Hand Mixer and a Medium Bowl, Silicone or Rubber Spatula, Medium Bowl, Small Ice Cream Scoop, Cooling Rack
1 Preheat the oven to 350°F and position an oven rack in the center. Line the baking sheets with parchment paper.
2 Place the butter, granulated sugar, and brown sugar in the bowl of the stand mixer and beat on medium-low speed until smooth and blended, about 2 minutes. You can also use a hand mixer and a medium bowl, although you may need to beat the mixture a little longer to achieve the same results. Scrape down the bowl with a spatula. Add the eggs one at a time and beat just until blended after each addition. Add the vanilla and blend well. Scrape down the bowl.
3 In a medium bowl, whisk together the flour, baking soda, and salt. Turn the mixer to the lowest speed and add the flour mixture all at once. Blend just until there are no more patches of flour. Scrape down the bowl.
4 Add the semisweet and milk chocolate chunks and the nuts (if using), and blend on low just until combined. Remove the bowl from the mixer and stir gently a few times with the spatula to make sure there are no more patches of unincorporated flour or butter lurking near the bottom of the bowl.
5 Using the small ice cream scoop or spoon, portion tablespoon-size mounds onto the prepared baking sheets, spacing them about 2 inches apart. Bake the cookies one sheet at a time, rotating the sheet halfway through, for 10 to 14 minutes, until the cookies are golden brown at the edges and still a bit pale in the center. If you want crisp cookies instead of chewy ones, bake for a couple of extra minutes. (To bake more than one sheet at a time, see page 271.) Transfer the cookies to a cooling rack and let them cool completely before serving.
Storing
Keep the cooled cookies in an airtight container at room temperature for 3 to 4 days.
Getting Ahead
You can make the dough up to 3 days ahead and refrigerate it in an airtight container. For nearly spur-of-the-moment cookies, portion the dough onto a baking sheet lined with parchment paper, putting the scoops right next to each other to fit all of them on one sheet. Place the pan in the freezer for 30 to 60 minutes, until the balls of dough are frozen. Transfer the cookie dough balls to a resealable plastic freezer bag and freeze until needed, up to 3 months. To bake, take out as many cookies as you need, space them on a parchment-lined baking sheet, and bake as directed, adding a couple of minutes to the baking time.
Friday, September 11, 2009
The French Pantry
 From Things Cooks Love: Implements. Ingredients. Recipes.
Almost every American cook has had some exposure to French cooking, and that made the selection of cookware, tools, and recipes for this chapter an exciting challenge. The French have had an amazing impact on what Americans eat and how we talk about cooking. You can hardly look at a cooking magazine, read a restaurant menu, or step into a fast-food joint without seeing the words soufflé, fondue, crème brûlée, pâté, quiche, and, of course, French fry. Discover specialized cookware such as the cocotte, the chinois, the raclette grill, the mussel pot, and the pommes Anna pan, and rediscover familiar pieces like the crepe pan, the omelet pan, and the fondue pot. Then you can serve up these Gallic specialties using the wonderful variety of cheeses, oils, vinegars, and other specialties of France.
Cheese
Brie
This rich cow’s milk cheese has a creamy, soft interior and is covered by a chalky, mildly flavored edible rind. Brie imitations are sold everywhere but, for a special meal, seek out an imported Brie de Meaux. (This is almost impossible to find in the United States because it is made from raw milk and aged less than the FDA-required sixty days. An excellent substitute is an imported knockoff called Fromage de Meaux that is almost as good as the real thing.)
Chèvre
The word chèvre means “goat,” and is also used to describe a pure goat’s milk cheese in France. Goat cheeses are made throughout the world, but the French probably have the widest range of types, shapes, and sizes. Typically, the cheeses have a tangy, almost lemony taste. Soft fresh goat cheeses are often melted into sauces or cut into disks, browned, and served as the enterpiece of a salad. The semiaged log-shaped Bucheron has a tangier, more complex flavor than a fresh chèvre, and a drier, chalkier texture that makes it ideal for crumbling on top of salads.
Comté
A cow’s milk cheese from the Jura in eastern France, near the Swiss border. It has a sweet, nutty taste and, although it is a firm cheese, it has a soft feel in your mouth. Sometimes compared to Gruyère, it is both a great melting cheese and eating cheese.
Check out Things Cooks Love for more on The Frech Pantry....
Tuesday, September 8, 2009
Corn Tortillas Casserole
 From Things Cooks Love: Implements. Ingredients. Recipes.
Prep time 30 min | cook time (sauce and chiles) 20 min | cook time (casserole) 35 min | serves 6
Known as a sopa seca, or "dry soup," this casserole is the definition of Mexican comfort food. Corn tortillas cut into strips are layered with spicy tomato sauce, roasted poblano chiles, and two types of cheese, one soft and melting and the other dry and sharp. The top is spiced with sour cream or Mexican crema, a rich, thick cream available in Mexican grocers, and then the whole thing is baked.
Implements
Large Sauté Pan, Stove-top Pepper Roaster, Tongs, Heavy 10-inch Skillet, Slotted Spoon, Round or Rectangular Terra-cotta Baking Dish
Ingredients
Tomato Sauce with Chipotle Chiles
2 tablespoons flavorless vegetable oil
¼ cup chopped white onion
1 clove garlic, chopped
3 cups canned tomato puree
1 canned chipotle chile in adobo sauce, finely chopped, plus 1 teaspoon adobo sauce
½ teaspoon coarse salt
1 poblano chile
Canola oil, for frying
12 to 15 day-old corn tortillas, cut into 1-inch-wide strips
1 cup (2 ounces) shredded queso Chihuahua or other semisoft melting cheese (such
as Monterey Jack or Muenster)
1 cup grated queso añejo or other sharp grating cheese (such as pecorino romano or Asiago)
½ cup sour cream, preferably Mexican sour cream, called crema
1. Make the sauce: Heat a large sauté pan or skillet over medium heat. Add the oil and onion to the pan and cook, stirring, for about 3 minutes, or until softened. Add the garlic and cook for 1 minute, or until fragrant. Add the tomato puree, chile and adobo sauce, and salt, and bring to a gentle boil, stirring. Decrease the heat to low and cook,
uncovered, for 10 minutes, or until thickened. Set aside.
2. Preheat a stove-top pepper roaster or a grill pan over medium-high heat or preheat a broiler. Char the skin of the poblano, turning with tongs, for 10 to 15 minutes, until evenly blackened and blistered. Place the charred poblano in a bowl, cover with aluminum foil or plastic wrap, and let stand for about 20 minutes, or until cool enough to handle and the skin has loosened. Rub the charred skin off the cooled chile with your fingertips, or use the tip of a small knife. Rinse with water, then slit the chile along its length and open it flat. Cut out and discard the stem and scrape away the seeds and white membranes with the tip of a spoon. Cut the poblano lengthwise into ¼-inch-wide strips and set aside.
3. Line a tray with paper towels. Pour oil to a depth of ½ inch into a heavy 10-inch skillet, place over medium heat, and heat until a tortilla strip dropped into the oil sizzles on contact. Working in small batches, fry the tortilla strips for 20 to 30 seconds, until they begin to crisp but not brown. Use a slotted spoon or skimmer to transfer the tortilla strips to the prepared tray. Repeat until all the tortillas strips are fried.
4. Preheat the oven to 350°F. Spread one-third of the sauce in a 10-by-2-inch round or an 8½-by-10½-by-2-inch terra-cotta, ceramic, or enameled cast-iron baking dish. Layer half of the tortilla strips on top. Sprinkle with one third each queso Chihuahua and queso añejo cheese. Layer half of the poblano strips on top. Spread with half of the remaining tomato sauce and layer with all of the remaining tortillas strips, half of each cheese, and all of the remaining poblano strips. Add a final layer of tomato
sauce and then a layer of both cheeses. Spread the sour cream over the top.
5. Bake for 35 to 40 minutes, until the casserole is hot and bubbly. Let stand 10 minutes and serve.
Tuesday, August 11, 2009
Cookware: Braiser - From Things Cooks Love
 This multiuse round, shallow, two-handled stovetop-to-oven pan has a domed lid that keeps braised foods moist throughout cooking. Without the lid, it can be used in the oven as a baker or as a sauté pan. It is made from a variety of materials, some attractive enough to use for serving.
Braiser
The braiser, also known as the bistro or buffet casserole, is handsome enough to go directly from the oven or stove top to the table. It is relatively shallow (2 ½ to 3 inches deep) and has a large cooking surface, making it suitable for sautéing, browning, and braising compact foods such as chicken, fish, chops, and vegetables. The snug-fitting domed lid locks in the juices and allows the condensation to drip back onto the food, keeping it moist while it slowly cooks.
The pan, which has two looped opposing handles, is available in relatively lightweight, polished stainless steel–clad aluminum that heats up quickly and cleans easily. The other choice is a mattefinished enameled cast iron, which is a much heavier pan and heats more slowly but holds the heat longer, making it perfect for keeping foods warm on a buffet.
Tips for Using
Not just for braising, the pan—sans the lid—works as a baking dish and as a skillet on the stove top.
Because it is flameproof, the braiser can be used under the broiler.
Its broad, shallow profile means the brasier is good for cooking rice, and rice dishes like pilaf, perfectly. The braiser is handsome enough to use as a serving dish.
Braiser Recipe
Beef Braciole Stuffed with Sausage, Two Cheeses, and Dried Currants
Prep 45 min | Cook time 1 to 1½ hr | Serves 4
Braciole is a favorite Italian dish of meat slices pounded flat, spread with a filling, rolled into little bundles, and then slowly braised. For this recipe, you can use beef round, flank, or chuck, but pork cutlets, cut from the leg, will also work. As with so many slow-cooked dishes, the flavors improve if the recipe is made ahead and then reheated just before serving. Serve with mashed potatoes, polenta, or a small pasta shape, such as orzo. Serve with Creamy Polenta with Two Cheeses (page 57) or Fluffy Yukon Gold Potatoes with Goat Cheese and Green Onions
(page 111).
Implements
Meat Pounder, Cooking String or Silicone Ties, Braiser, Tongs, Flat-Edged Wooden Spoon or Flat Whisk, Food Mill, Cutting Board
Ingredients
Stuffing
8 ounces sweet Italian sausages, preferably with fennel, casings removed
1 large egg, lightly beaten
½ cup fine dried bread crumbs
½ cup (2 ounces) diced aged provolone cheese
½ cup grated pecorino romano or Asiago cheese
2 tablespoons chopped fresh Italian parsley
2 tablespoons dried currants or dark raisins
1 clove garlic, minced
8 thin slices (¼ to ¹⁄3 inch thick) boneless beef top round, flank, or chuck (about 1¼ pounds total)
Coarse salt and freshly ground black pepper
2 tablespoons extra-virgin olive oil, plus additional as needed
Sauce
½ cup finely chopped yellow onion
½ cup finely chopped carrot
1 clove garlic, minced
½ cup full-bodied red wine
1 (28-ounce) can Italian plum tomatoes with juices
1 bay leaf
1 tablespoon finely chopped fresh Italian parsley, for garnish
1. Make the stuffing: In a large bowl, combine the sausage meat, egg, bread crumbs, provolone cheese, pecorino romano cheese, parsley, currants, and garlic, and stir until well blended.
2. Lay a large piece of plastic wrap on a flat surface and place a slice of beef on top. Place a second piece of plastic wrap on top of the beef. Using a meat pounder, gently but firmly pound the meat, beginning in the center and working your way to the edges, until the meat is an even ¹⁄8 inch thick. Repeat with the remaining beef slices. Depending on the weight of the pounder and the thickness of the meat, each slice can take 10 to 20 firm, purposeful whacks to achieve the correct thickness.
3. Cut 16 pieces of cooking string each 10 inches long, or have ready silicone ties. Sprinkle each meat slice with a pinch of salt and a grinding of pepper.
4. Divide the stuffing into 8 equal portions (each one will be a heaping ¼ cup). Place a portion in the center of a meat slice and spread to within ½ inch of the edges. Press the stuffing evenly into the meat. Beginning with the narrow end, roll up the meat around the stuffing to make a neat bundle. Using the string or ties, tie each roll crosswise and lengthwise, like a package, securely but not too tightly. Repeat with the remaining meat slices and stuffing.
5. Heat the braiser over medium heat until hot enough for a drop of water to sizzle on contact, then add the olive oil. Arrange the meat rolls in the pan (they fit best if arranged like wheel spokes) and brown on all 4 sides, turning the rolls with tongs, for about 5 minutes total, or until evenly colored. Using the tongs, transfer the meat to a plate.
6. Make the sauce: If the pan is dry, add an additional drizzle of oil. Add the onion and carrot, and cook, over medium-low heat, stirring occasionally, for 5 minutes, or until softened. Add the garlic and cook for 1 minute, or until softened. Add the red wine and bring to a boil. Using the flat edge of a wooden spoon or a flat whisk, scrape the browned bits from the bottom of the pan. Boil the wine for 5 minutes, or until reduced by half. Remove from the heat.
7. Set a food mill fitted with the fine disk on the rim of a medium bowl, add the tomatoes with their juices, and puree. Or, puree the tomatoes in a food processor and then press though a fine-mesh strainer to remove the seeds.
8. Add the tomatoes and bay leaf to the braiser and bring to a boil. Return the beef rolls to the sauce, turning with the tongs to coat well, and reduce the heat to low. Cover and cook for 1 to 1 ½ hours, until the meat is tender when pierced with a fork. Turn the rolls occasionally and check to make sure the sauce isn’t boiling too hard.
9. Transfer the rolls to a cutting board and let rest for 5 minutes. Meanwhile, boil the sauce over high heat for 2 to 3 minutes, until slightly thickened.
10. Snip the strings from the beef rolls and discard, or untie the silicone ties. Cut the rolls on the diagonal into slices ½ inch thick, and arrange the slices on a warmed deep platter. Remove and discard the bay leaf from the sauce. Spoon the sauce on top of the rolls and sprinkle with the parsley. Serve hot.
Wednesday, July 15, 2009
Clam, Pork, Sausage, and Bacon Stew
 From Things Cooks Love, by Sur La Table and Marie Simmons
Prep 30 min | cook time 50 min | serves 4
A number of traditional Portuguese dishes are based on the unlikely, but flavorful, combination of pork and shellfish. This variation on amêijoas na cataplana, the classic clam and pork stew, calls for three types of pork: fresh pork cubes, spicy sausage, and bacon. The addition of Italian green beans, also known as romano beans, with the clams makes this recipe a one-pot meal. Serve with plenty of bread to sop up the flavorful sauce.
Implements:
Food Mill, Rubber Spatula, Large, Heavy Skillet, Cataplana, Oven Mitts
Ingredients:
1 can (28-ounce) Italian plum tomatoes with juices
2 tablespoons extra virgin olive oil
2 (1/4-inch-thick) slices bacon, cut into ¼-inch dice
1 cup chopped yellow onion
1 cup chopped red bell pepper
1/2 cup chopped green bell pepper
3 cloves garlic, coarsely chopped
4 ounces chouriço or chorizo, casings removed and cut into ¼-inch dice
4 ounces pork tenderloin, loin, or shoulder, cut into ¼-inch dice (optional)
2 teaspoons sweet paprika
1/2 cup dry white wine
2 tablespoons finely chopped fresh Italian parsley
2 pounds littleneck or Manila clams, cleaned (see Tip, page 222)
8 ounces romano or other green beans, trimmed and cut into 1-inch lengths
- Fit a food mill with the medium disk, and set the mill on the rim of a medium bowl. Put the tomatoes with their juices in the food mill and puree. Reverse the crank to extract every bit of flavor from the tomato pulp, and occasionally stop to clean the underside of the mill with a rubber spatula, so the puree falls freely. Discard the pulp left in the strainer. Set the puree aside.
- In a large, heavy skillet, heat the olive oil over medium heat until hot enough to sizzle a piece of bacon. Add the bacon and cook, stirring, for 5 minutes, or until lightly browned. Add the onion and red and green peppers and sauté, stirring, for 8 minutes, or until the vegetables are wilted and beginning to turn golden. Add the garlic and sauté for 1 minute. Stir in the chouriço and pork and cook, stirring, for 3 minutes, or until lightly browned. Sprinkle with the paprika and cook, stirring, for 1 minute.
- Add the wine, tomatoes, and parsley and bring to a boil. Decrease the heat to low and cook, uncovered, for 20 minutes, or until liquid is slightly reduced.
- Spoon half of the sauce into the cataplana; spoon the clams on top and scatter the green beans over the clams. Spoon the remaining sauce on top. Secure the cover in place.
- Place the cataplana over medium heat and cook for 10 minutes, or until the clams have opened. Bring the cataplana to the table and, using oven mitts, carefully remove the cover. Discard any clams that failed to open. Spoon the clams and rich sauce into warmed shallow bowls and serve at once.
tip
Preparation in Alternative Cookware
Cook the sauce in a Dutch oven or braiser instead of the skillet. Add the clams, cover, and cook as directed for the cataplana.
Tuesday, June 30, 2009
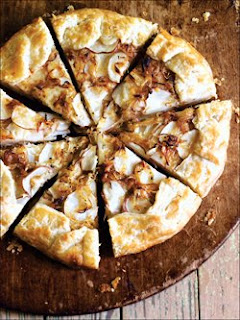
Potato, Onion, and Gruyère Galette
 From The Art and Soul of Baking, by Sur La Table and Cindy Mushet
Serves 8 to 10
Here is a savory version of the free-form fruit tart known in France as a galette. If Gruyère is unavailable, substitute Italian fontina or any good melting cheese. Be sure to use red or fingerling potatoes, as they hold their shape much better than baking potatoes, like russet, whose interiors turn to mush when cooked. Though rustic and casual, it is an instant party food when dressed up with crème fraîche and golden caviar.
Ingredients
1 recipe Flaky Pie or Tart Dough (page 157)
Filling
1 large onion (12 ounces), thinly sliced
1 1/2 tablespoons olive oil
1/4 teaspoon kosher salt
5 grinds black pepper
1/2 teaspoon finely chopped fresh thyme or rosemary
4 ounces Gruyère cheese, grated
1 pound red potatoes
To Finish
1 tablespoon olive oil
Pinch kosher salt
3 grinds black pepper
1 egg
For Serving (optional)
Crème fraiche
Golden caviar
Equipment
Chef’s Knife, Sauté Pan, Small Bowl, Pastry Brush, Paring Knife or Skewer, Metal Spatula, Cake Lifter or Two Spatulas or the Bottom of a Tart Pan
1 Advance Preparation: Roll the prepared dough into a 13-inch round, transfer to a parchment- or silicone-lined baking sheet, and chill for 1 hour. Preheat oven to 400°F and position an oven rack in the lower third.
2 Make the filling: Heat the sauté pan over a medium-high flame. Add the olive oil and when it is hot, add the onion slices to the pan. Cook, stirring occasionally, until the onion is soft and lightly colored, 8 to 10 minutes. Stir in the salt, pepper, and chopped thyme or rosemary and blend well. Scrape onto a plate and set aside to cool. Wash the potatoes and pat dry, but don’t peel them. Cut into 1/4-inch-thick slices.
3 Assemble the galette: Mix together the cooled onion mixture, grated cheese, and potato slices. Spread the mixture over the prepared pie dough, leaving a 1 1/2-inch border around the edges. Drizzle with the remaining olive oil and sprinkle lightly with salt and pepper. Fold just the border of the dough up around the filling, pleating it to make a pretty, circular enclosure, leaving the center open. In a small bowl, beat the egg with a fork. Lightly brush the pleated dough with the egg to give it shine and help it brown in the oven.
4 Bake the galette for 45 to 50 minutes, or until the pastry is golden brown and the potatoes are soft when tested with a paring knife or skewer. Check the bottom of the galette for doneness by lifting slightly with a metal spatula. Transfer to a rack to cool for 5 to 10 minutes.
5 Transfer the galette to a serving plate with a cake lifter or two spatulas, or the bottom of a tart pan slipped underneath to keep it from breaking as you move it. Slice and serve warm.